صفا سنتر | دانلود نرم افزار و بازی Symbian,S^3,Anna,Belle
بزرگترین و بروزترین مرجع Symbian^3 & Anna & Belle -دانلود,آموزش,ترفند,فتوشاپ,sms,سرگرمی و...صفا سنتر | دانلود نرم افزار و بازی Symbian,S^3,Anna,Belle
بزرگترین و بروزترین مرجع Symbian^3 & Anna & Belle -دانلود,آموزش,ترفند,فتوشاپ,sms,سرگرمی و...آموزش فتوشاپ-طراحی جنگجو شمشیر سبک چکیده با اثر آتشین در فتوشاپ

Step 1
Create a new document sized 790px * 1050px with black background, create a new layer and use the gradient fill (set to radial gradient) tool to fill the background as shown below:
Load the stone texture into Photoshop, use the quick selection tool to select a portion of the texture as shown below – we will be using this to create some ground texture:
Copy and paste the selection onto our document, use the free transform tool to perspective it a bit to create some depth:
Use a soft eraser tool to remove the edges so it fades into the background:
Add the following 3 adjustment layers to this stone texture as clipping mask:
Black and White
Levels
Curves
and here is the effect you will have so far:
Step 2
Load the model image into Photoshop, cut out the model and paste it onto our canvas, resize and position the model in the centre as shown below:
Use the Smudge Tool with 6px pressure to remove the roughness around the legs area:
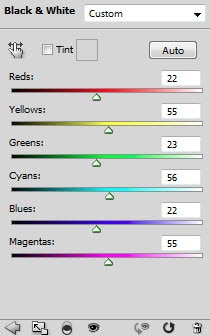
Add the following 3 adjustment layers on this model layer as clipping mask:
Black and white
Layer mask on this black and white adjustment layer:
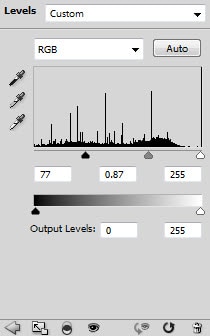
Levels
Layer mask on the levels adjustment layer:
Curves
Layer mask on the curves adjustment layer:
After the adjustment, you will find that we now have some burnt effect around the legs, which I think works well with the fiery theme:
Create a new layer and use a soft black brush, paint some shadow under the feet: (use a 20% flow and opacity setting, we don’t want to over paint the shadow)
and here is the effect so far:
Step 3
In this step, we will be adding some cloud and fire effect to the image. With the cloud part, we can simply use the cloud filter in Photoshop, combing it with the warp tool to render some nice effect around the model:
If you’re having trouble with the technique, check out one of my basic tutorial here: 5 Useful Little Photoshop Tricks to Add Extra Elegance For Your Design
Make sure you adjust the layer opacity of the cloud layers, so that you will have more levels and depths for the image:
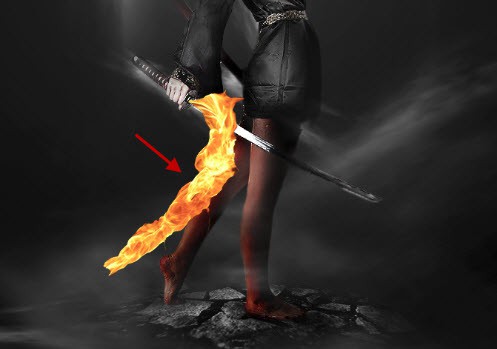
We can now add some fire effect for the model. Load the fire image into Photoshop, and use the quick selection tool to select a portion as shown below:
Copy and paste the selection onto our document, resize and fit it to the leg area as shown below:
Use the liquify filter forward warping tool, adjust the shape of the fire a bit:
Then go back to the original model layer, load the selection of the it and inverse the selection:
On the fire texture layer, go to “Edit > Clear” and clear the selection, and leave only the portion that is on the leg:
Change the blending mode of this fire texture layer to “overlay”, you will have the following effect:
Apply the same technique as shown above (apart from changing the blending mode), add some more fire texture around the model:
Step 4
Now we can add some extra flying rocks for the image. Go back to the stone texture and use the quick selection tool to select some random blocks of the stone ground, as shown below:
Copy and paste the selection onto our document, rotate it and use a soft eraser to remove the edges of the stone to fade it into the cloud:
Add the following 2 adjustment layers onto the stone layer as clipping mask:
Black and White
Levels
and you will have the following effect:
Create a layer folder and put these layers into it, duplicate it a few times and scatter the duplicates stones layer around the canvas:
Hint: adjust the settings on the levels adjustment layer for the contrast of the stone, and the layer opacity of the stone layers for variety. Apply some motion blur to create a flying effect.
Step 5
OK we’re almost done. For extra effect, I decide to add some debris around the model using the debris brush downloaded:
Duplicate this particle layer once, and apply the following Radial Blur settings to the duplicated layer:
And you will see the following blurring effect for the particles:
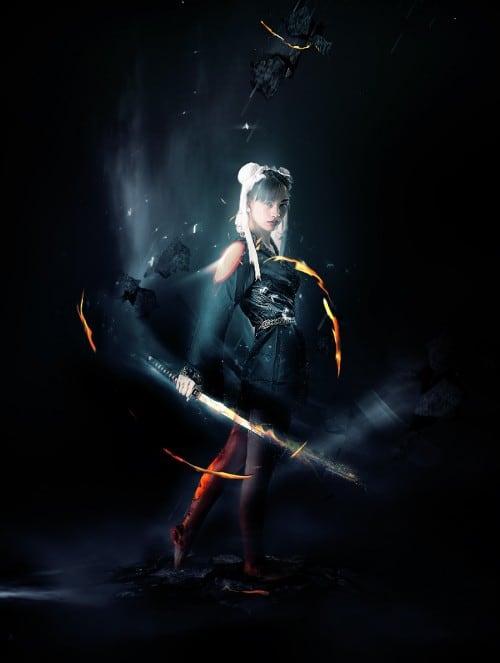
You can further add some colour and adjust the contrast of the image via a few more adjustment layers, and here is my final result for this Photoshop tutorial: (click to enlarge)
That’s it for this tutorial! Hope you enjoy it and find it useful :) Till next time, have a great day!
ترجمه گوگل
خوب اجازه بدهید در شروع کنید!برای تکمیل این آموزش ، شما سهام های زیر نیاز دارید :مدل * های ناهموار ممکن میکند چشمسنگآتشقلم مو باقی ماندهمرحله 1ایجاد
یک سند جدید در اندازه 790px * 1050px با پس زمینه سیاه ، یک لایه جدید
ایجاد و استفاده از ابزار پر شیب (گرادیان شعاعی) پس زمینه برای پر کردن در
زیر نشان داده شده :بار
بافت سنگ به فتوشاپ ، استفاده از ابزار انتخاب سریع یک بخشی از بافت زیر
نشان داده شده را انتخاب کنید -- ما خواهد بود با استفاده از این برای
ایجاد برخی از بافت زمین :کپی و چسباندن انتخاب را بر روی سند ما ، استفاده از ابزار تبدیل رایگان به چشم انداز آن را کمی به ایجاد برخی از عمق :با استفاده از ابزار پاک کن نرم حذف لبه تا آن را محو در پس زمینه :اضافه کردن 3 زیر لایه های تنظیم بافت سنگ این کار را به عنوان Clipping Mask بزنید :سیاه و سفیدسطحمنحنیو در اینجا اثر شما تا کنون است :مرحله 2بار
تصویر مدل را به فتوشاپ ، مدل برش دادن و چسباندن آن بر روی بوم ما ،
تغییر اندازه و موقعیت مدل را در این مرکز به عنوان زیر نشان داده شده :با استفاده از ابزار لکه را با 6px فشار زبری در اطراف ناحیه پاها به حذف :اضافه کردن 3 زیر لایه های تنظیم شده در این لایه مدل به عنوان قطع ماسک :سیاه و سفیدلایه ماسک بر روی این لایه سیاه و سفید تنظیم :سطحلایه ماسک روی لایه تنظیم سطوح :منحنیلایه ماسک روی لایه تنظیم منحنی :پس
از تنظیم ، شما را پیدا خواهد کرد که ما در حال حاضر برخی از اثر سوخته در
اطراف پاها ، که من فکر می کنم آثار خوب با موضوع آتشین :یک
لایه جدید ایجاد و استفاده از یک براش نرم و سیاه و سفید ، رنگ برخی از
سایه به زیر پا : (استفاده از جریان 20 ٪ و تنظیم کدورت ، ما نمی خواهیم که
در سایه بیش از رنگ)و در اینجا اثر تا کنون :مرحله 3در این مرحله ، ما با اضافه کردن برخی از ابر و آتش اثر را به تصویر خواهد شد. با
بخشی ابر ، ما به سادگی می توانید از فیلتر ابر در فتوشاپ ، استفاده از
ترکیب آن را با ابزار پیچ و تاب به برخی از اثر خوبی در اطراف مدل بارگزاری
صفحه :اگر
شما با داشتن مشکل با این روش ، یکی از آموزش پایه است که من در اینجا : 5
سپاسگزاری کرده اند کلاهبرداری فتوشاپ کوچولو ظرافت اضافی برای طراحی خود
را اضافهاطمینان حاصل کنید که کدورت لایه از لایه های ابر تنظیم شما ، به طوری که شما سطح بیشتر و عمق تصویر داشته باشند :ما هم اکنون می توانید برخی از اثر آتش برای مدل اضافه کنید. بار تصویر آتش در فتوشاپ و استفاده از ابزار انتخاب سریع قسمت را انتخاب کنید همانطور که در زیر نشان داده شده :کپی و چسباندن انتخاب را بر روی سند ما ، تغییر اندازه و مناسب آن را به منطقه پا به عنوان زیر نشان داده شده :با استفاده از ابزار فیلتر تبدیل به مایع کردن تاب برداشتن رو به جلو ، تنظیم شکل آتش بیت :سپس دوباره به لایه اصلی مدل ، بار انتخاب آن و معکوس انتخاب :بر روی لایه بافت آتش ، رفتن به "ویرایش> پاک کردن" و روشن انتخاب ، و ترک تنها بخشی است که در ساق پا :تغییر حالت ترکیب آتش این لایه بافت به «همپوشانی» ، شما اثر زیر را داشته باشید :اعمال
روش های مشابه همانطور که در بالا نشان داده شده (به غیر از تغییر حالت
ترکیب) ، اضافه کردن بافت برخی از آتش سوزی در اطراف مدل :مرحله 4حالا ما می توانیم برخی از سنگ ها پرواز اضافی برای تصویر اضافه کنید. بازگشت به بافت سنگ و استفاده از ابزار انتخاب سریع به انتخاب برخی از بلوک های تصادفی از زمین سنگ ، که در زیر نشان داده شده :کپی و چسباندن انتخاب را بر روی سند ما ، آن را چرخش و استفاده از پاک کن نرم به حذف لبه های سنگ آن را به ابر محو شدن :اضافه کردن 2 زیر لایه های تنظیم را بر روی لایه سنگ به عنوان Clipping Mask بزنید :سیاه و سفیدسطحو شما اثر زیر را داشته باشید :ایجاد یک پوشه لایه قرار داده و این لایه را در آن ، آن را چند بار و پراکنده تکراری لایه سنگ در اطراف بوم تکراری :
نکته : تنظیم تنظیمات لایه تنظیم سطوح کنتراست سنگ ، و کدورت لایه از لایه های سنگ برای انواع. درخواست برخی از تاری حرکت برای ایجاد یک اثر پرواز.مرحله 5خوب ما تقریبا انجام شده است. اثر فوق العاده ، من تصمیم به اضافه کردن برخی از آوار اطراف مدل با استفاده از برس بقایای دریافت ها :تکراری این لایه ذرات یک بار ، و اعمال تنظیمات زیر را radial blur را به لایه کپی شده :و شما اثر زیر مات برای ذرات را ببینید :بعلاوه
شما می توانید برخی از رنگ و اضافه کردن تنظیم کنتراست تصویر از طریق چند
لایه تنظیم ، و در اینجا است که نتیجه نهایی من برای این آموزش فتوشاپ :
(برای دیدن تصویر بزرگتر روی آن کلیک کنید)است که آن را برای این آموزش! امیدوارم که شما از آن لذت ببرید و آن را مفید :) تا دفعه بعد ، یک روز بزرگ!


